

Drawing A Nose Step By Step
Do you dare to draw a realistic nose from the front? If so, I hope this "How to draw a nose step by step guide" will help you! The process for drawing a nose is not complicated and can be done in 9 simple steps.
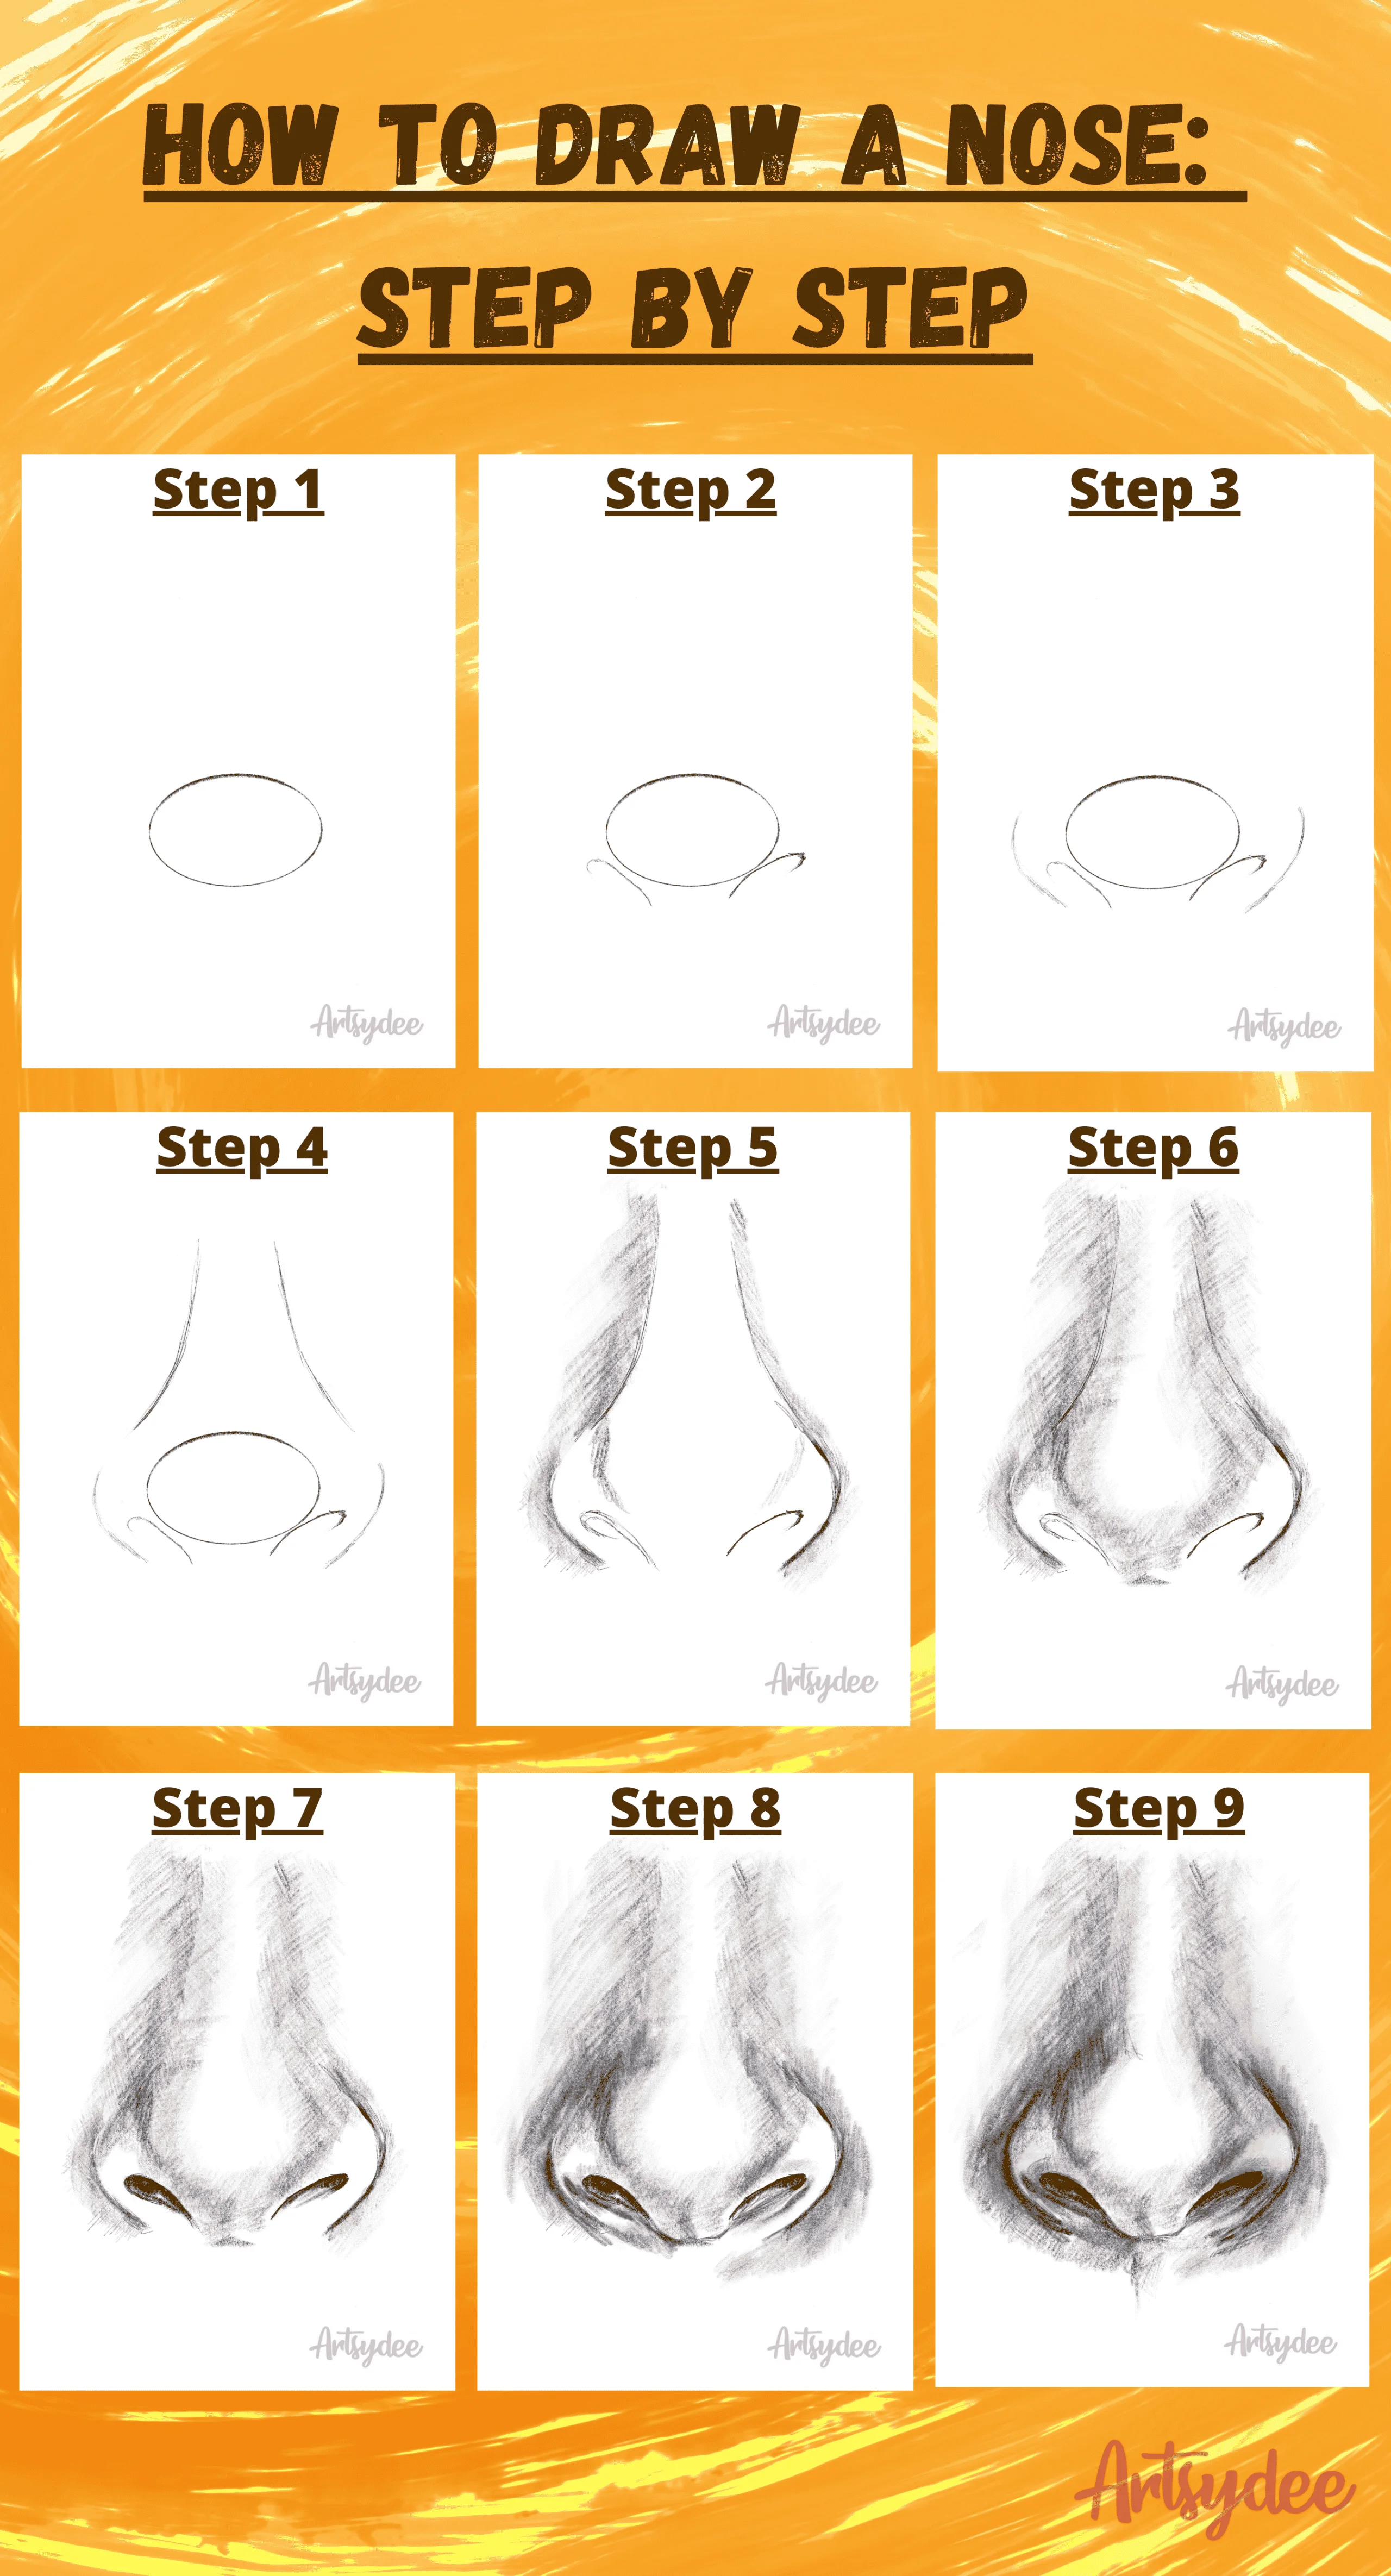
A Quick-Start Guide for Drawing a Nose from the Front:
- To start, sketch the basic shape of the nose – an oval for the top of the nose and two ellipses for nostrils.
- Next, add tone to your sketch with pencil shading.
- Finish off your drawing by refining shadows and highlights.
Now that you've learned how to draw a realistic-looking nose in just 9 quick steps, go try it out! Drawing noses may seem intimidating at first but don't worry; the more you practice the better you will get!
*This page may contain affiliate links to products I have used or recommend. If you purchase something from this page, I may receive a small percentage of the sale at no extra cost to you.**
Detailed Guide on How to Draw a Nose Step by Step.
If you want to draw a realistic nose (or any realistic object, person, or scene), it is always a good idea to have a clear reference picture.
You can find a good reference picture on a free stock photo site like Unsplash.com. Or you can grab your mobile phone, and take a few shots of your friend, colleague, classmate, or partner.
It is often the case that using reference images that you have taken yourself, leads to better drawing! This is because you have an emotional connection to the subject matter.
PRO TIP: If you are taking photos on your mobile phone make sure you have good lighting so that your shadows and highlights are clearly visible and you can easily identify the shapes in your image.
Step 1: Draw an ellipse.

Start by drawing an ellipse. The ellipse becomes the top, protruding part of your nose and also the first shape that we use to guide the rest of our nose drawing.
PRO TIP: It's a good idea to draw with a 2B pencil or darker. The lead in a 2B, 4B, 6B (and so on) is a lot softer than an HB or 2H pencil.
This means it is easier to achieve a visible pencil mark on your page without pressing too hard.
If you press too firmly on your page it may be more difficult to erase the pencil mark if you need to make changes.
Always start by plotting the shapes of your drawings with soft pencil lines.
Step 2: Draw the shape of the inner nostril.

Draw in the 'c' shape of the opening of the nostril on either side of the ellipse.
By plotting out this shape, you will have a better idea of where the outer part of the nostril is, and how to go about adding shadow to the receding areas.
This all helps you build your sketch towards being a realistic nose drawing.
Step 3: Draw the shape of the outer nostril.

You can now draw the "c" shape of the outer nostril. Essentially, this is a larger "c" shape than the one for the nostril entrance above.
Step 4: Draw the bridge of the nose.

Use a soft outline to define the bridge of the nose. You will be erasing this later on because it is only used as a gentle guideline to help you plot the shapes, shadows, and highlights in your drawing.
Step 5: Begin shading around the bridge of the nose and erase the ellipse.

Start adding soft shading on the sides of the bridge of the nose, as well as around the edge of the ellipse.
Once you have defined some of the top of the nose using shadow, you can erase the ellipse.
PRO TIP: The shading technique you can use for smooth shading of a nose is called grading or blending.
Lower your pencil so that you are putting pressure on the side of the lead – not directly on this tip.
This means more of the lead touches the surface of the paper and you get a softer, larger mark on the page. This makes it easier to cover larger areas of shadow without irregular marks.
Step 6: Add more shading.

Add more shading to the sides of the nose and around the tip of the nose.
Make sure to leave the tip of the nose white so as to accentuate the highlight and make it appear three-dimensional.
Step 7: Darken the shadow within the nostril.

As you can see I start off with a very dark pencil shade in the innermost part of the nostril and lighten the shadow at the entrance to the nostril.
Step 8: Add more shadow.

Add more shadow to the areas next to the nostril and around the tip of the nose.
Step 9: Final Step – Darken your shadow areas.

Darken your shadow areas and add more shading to the nostrils and beneath the nose.

Tools you need to draw a realistic nose, step-by-step.
If you have just started out drawing (and even if you are a more seasoned artist), it can be tough to figure out what tools and materials you need to get started on a successful drawing.
I have been teaching art for 15 years (and have been making my own for far longer) so these are my top recommendations for equipment, tools, and materials that will help you achieve the best results in your drawing. If you would like an overall Drawing Kit that will have all your bases covered, have a look at these top Drawing Kits.
Drawing Pencils (Faber Castell is my go-to brand because the quality is always good, and they are easier on the bank balance!)
A Drawing Pad or sketchbook: It's a good idea to have a drawing pad or sketchbook that you can open up and work in. It's also handy to have one where you can easily remove the pages if you want to sell your drawings, mount or frame them.
Kneadable Eraser: This is an absolute must for drawing. You can alter the shape of the eraser so that you can easily erase tiny areas within your artwork. You can also use this eraser to lift areas of shading that have been overworked.
Sharpener: A sturdy reliable blade that will keep your pencils ready for sketching.

Conclusion
So, if you have felt clueless about how to start drawing a realistic nose I hope this step-by-step guide has helped!
It's time to get started with your own drawing of a realistic human nose. You can do it; just follow these simple instructions and enjoy the process.
I hope that my "How To Draw A Nose Step By Step Guide" has helped you out today. If so, please share with friends or leave a comment below.
Happy drawing 🙂
Other articles you may enjoy…
How to draw faster: 29 Tips to Speed up Your Sketching Skills
12 Easy Steps to an Accurate Side Profile Drawing
How to Get Ideas for Drawing: 31 Ways to Find Unique Ideas
11 Ways to Improve Your Drawing
11 Top Drawing Kits
Drawing A Nose Step By Step
Source: https://artsydee.com/how-to-draw-a-nose-step-by-step
Posted by: deschampshignigho.blogspot.com
0 Response to "Drawing A Nose Step By Step"
Post a Comment